
-
This is a reminder of 3 IMPORTANT RULES:
1- External self-promotion websites or apps are NOT allowed here, like Discord/Twitter/Patreon/etc.
2- Do NOT post in other languages. English-only.
3- Crack/Warez/Piracy talk is NOT allowed.
Breaking any of the above rules will result in your messages being deleted and you will be banned upon repetition.
Please, stop by this thread SoccerGaming Forum Rules And Guidelines and make sure you read and understand our policies.
Thank you!
You are using an out of date browser. It may not display this or other websites correctly.
You should upgrade or use an alternative browser.
You should upgrade or use an alternative browser.
Scoreboard Creation Tutorial Part I
- Thread starter riesscar
- Start date
Emiliano222
Club Supporter
re-edited the scoreboards with the new update 6, updated links in youtube video, thanks!
Can you make the scoreboard of Copa Libertadores 2023?Part 1
Creation of scoreboards and overlays differs from other Fifa modding. This is because - although you will need to make simple textures - it is almost entirely a process of hex editing. In this tutorial I will show you the steps to create a custom scoreboard.
Here is the scoreboard we will attempt to create:
1.) What you will need:
- Some sort of hex editing software. Hxd is a good option. There is no need to pay for a program, as there are plenty of free options
- Fifa Editor Tool
- Photoshop
- The following .big file: https://drive.google.com/file/d/1SMh-tvCfkrbeTq-Qy8YVAEt6Y1cltsvR/view?usp=sharing
2.) Important things to know:
When editing hex code, it is important to never delete or add to the code. You can only alter it, as deletion or addition of code will almost certainly corrupt the file.
3.) Limitation
EA has moved away from simple scoreboard files like the one we will be using. Now they utilize more complex series of calls from one file to another, and they use a plethora of small snippets of textures to dynamically create the scoreboard. This allows for transition effects. We will be using a scoreboard file from FIFA 19 (that will still work with subsequent titles). It may be possible to edit the new scoreboard files, but I am not knowledgeable enough about hex editing/coding to figure out how to do so.
4.) Why scoreboards require hex editing in addition to texture editing
Lets look at what happens when I only replace the texure of an FA cup scoreboard that I made previously:

Looking at the image above, lets look at what we will need to change in the hex code to make this scoreboard work:
1) The team names, score digits, team color bars, and the clock are all in the wrong locations.
2) The team name colors are black while they should be white, and the clock is white when it should be blue (it will be in the center)
3) The team color bars are not the correct shape (they whould be rectangular and the same height as the scoreboard
4) The font is not correct
5) We need to add the league crest to the middle center
The first issue will require moving the items on an x/y axis by using a hex to floating point calculator. This process is the most time consuming and will require the most trial and error.
The second issue requires that we change the coded color of the items by editing the hex code.
The third and fifth issues requires that we edit the textures contained in the .big file. This is a simple photoshop process.
The fourth issue is a simple edit of the decoded hex
5.) Hex code addresses
So the obvious question is: so what part of the hex code needs to be edited? We do not know that most of the code does... we only know where certain values are in the code because the hex addresses have been determined (not by me). Here is a spreadsheet of the hex addresses of the values you may want to edit:
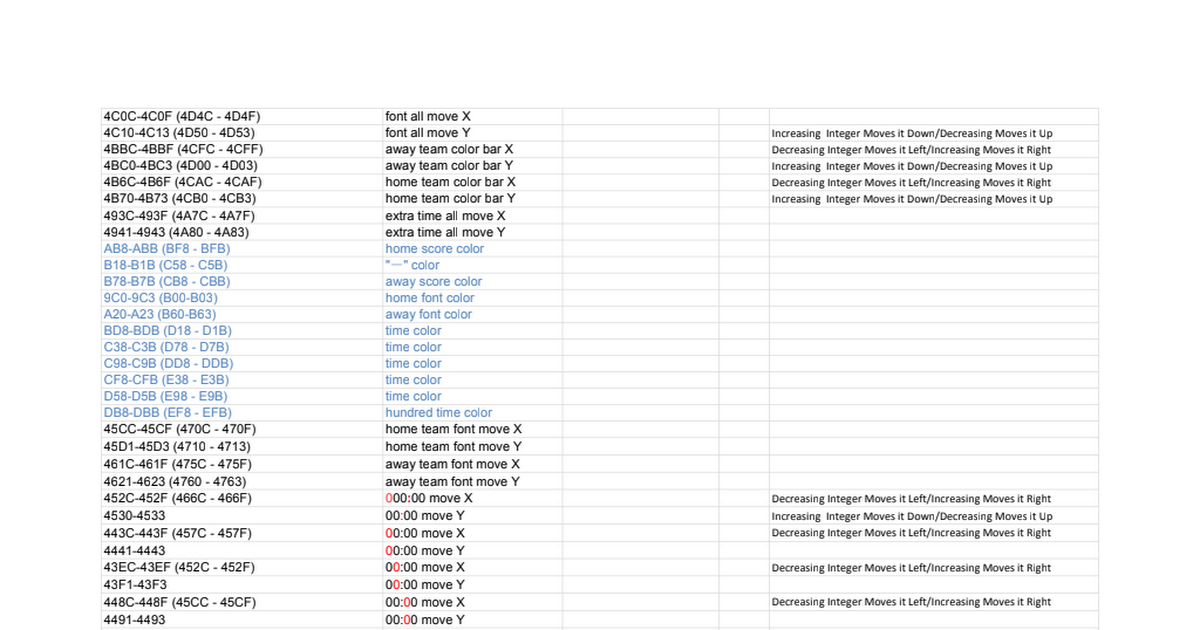
SCOREBOARD_offset.xlsx
Sheet1 4C0C-4C0F (4D4C - 4D4F),font all move X 4C10-4C13 (4D50 - 4D53),font all move Y,Increasing Integer Moves it Down/Decreasing Moves it Up 4BBC-4BBF (4CFC - 4CFF),away team color bar X,Decreasing Integer Moves it Left/Increasing Moves it Right 4BC0-4BC3 (4D00 - 4D03),away team color bar Y,I...docs.google.com
Note that I am in the process of updating the hex addresses... for some reason the program with which the hex addresses were determined lists different addresses than Hxd and other hex editors.
Let's begin by changing the team name font color from black to white. We look at the spreadsheet and see that the hex address for the away team font color is 9C0-9C3 (B00-B03 in HXD) and for the home team is A20-A23 (B60-B63 in HXD). So what do these numbers mean? Lets look at the .big file opened in Hxd so that we can see how to use these addresses:

Note that I have only taken a screenshot of the first four columns for the purpose of explanation and clarity... there will be addresses which reference rows beyond '03'.
So because the address for the away team font color is B00-B03, we need to edit the hex offsets B00, B01 and B02. Note that there is a reason I did not list B03... hex values are six digits long (hence the name hex). The characters which follow the hex code at the addresses we need to edit do serve a purpose, though. The 'FF' signifies that the preceding six digits were color values. As you can see, the values are currently '00 00 00' for both addresses (so it reads '00 00 00 FF'). The value is entered as a hex color code, and code for black is '00 00 00'. The code for white is 'FF FF FF', so this is what we will change the values to: 'FF FF FF' (which will read 'FF FF FF FF')

Looking up hex color codes is very simple. You can simply set the color in photoshop and the hex code is displayed below. Let's say that I wanted the font to be yellow... I would select the color in photoshop that I want and below you will see the hex color code:

The color code values are Red / Green / Blue. Because the code is 'FF EA 00', that means that the value for Red is 'FF', the value for Green is 'EA' and value for Blue is '00'. The way that the code is entered into the .big is with these three reversed in order, though. This is important to remember. So the values would be entered B / G / R... therefore, if I wished to made the team names yellow I would enter 00 EA FF (which would read '00 EA FF FF').
After editing the team name color value, let's save and ensure that our changes have taken effect. This is one thing that makes scoreboard creation laborious: you will need to launch the game and begin a match to see each edit that you make.
As you can see in this screenshot:

we have successfully edited the team name. Now we need to do the same for the score color values and clock (which will be blue)
Finally, please note that although you will see a three values for the score color, we will actually be taking an easier route which will be to edit the following address: 26098-260A7. When you navigate to this address (which is at the end of the file, so just scoll to the bottom and then scroll up to it) look to the right where where the 'Decoded Text' is. You will notice that it the code is displayed in normal letters, and it currently is "COLOR_TEXT_WHITE". We are going to edit this from white to navy blue... so place your cursor in front of the 'C' in the decoded text column and being typing the following (it will automatically overwrite the code when you type): "COLOR_TEXT_NAVY_BLUE".
Please let me know if this tutorial structure will work. If you are finding that this is difficult to follow let me know so that I don't waste time making Part 2.
Gavin Langford
Club Supporter
How do I seperate both 0 in the "0-0" to increase the distance between them??
yilmaz.2535
Club Supporter
I can't move the time zone left or right. Has it been updated?
Futbol Club
Club Supporter
Brother, how are you?Part 1
Creation of scoreboards and overlays differs from other Fifa modding. This is because - although you will need to make simple textures - it is almost entirely a process of hex editing. In this tutorial I will show you the steps to create a custom scoreboard.
Here is the scoreboard we will attempt to create:
1.) What you will need:
- Some sort of hex editing software. Hxd is a good option. There is no need to pay for a program, as there are plenty of free options
- Fifa Editor Tool
- Photoshop
- The following .big file: https://drive.google.com/file/d/1SMh-tvCfkrbeTq-Qy8YVAEt6Y1cltsvR/view?usp=sharing
2.) Important things to know:
When editing hex code, it is important to never delete or add to the code. You can only alter it, as deletion or addition of code will almost certainly corrupt the file.
3.) Limitation
EA has moved away from simple scoreboard files like the one we will be using. Now they utilize more complex series of calls from one file to another, and they use a plethora of small snippets of textures to dynamically create the scoreboard. This allows for transition effects. We will be using a scoreboard file from FIFA 19 (that will still work with subsequent titles). It may be possible to edit the new scoreboard files, but I am not knowledgeable enough about hex editing/coding to figure out how to do so.
4.) Why scoreboards require hex editing in addition to texture editing
Lets look at what happens when I only replace the texure of an FA cup scoreboard that I made previously:
Looking at the image above, lets look at what we will need to change in the hex code to make this scoreboard work:
1) The team names, score digits, team color bars, and the clock are all in the wrong locations.
2) The team name colors are black while they should be white, and the clock is white when it should be blue (it will be in the center)
3) The team color bars are not the correct shape (they whould be rectangular and the same height as the scoreboard
4) The font is not correct
5) We need to add the league crest to the middle center
The first issue will require moving the items on an x/y axis by using a hex to floating point calculator. This process is the most time consuming and will require the most trial and error.
The second issue requires that we change the coded color of the items by editing the hex code.
The third and fifth issues requires that we edit the textures contained in the .big file. This is a simple photoshop process.
The fourth issue is a simple edit of the decoded hex
5.) Hex code addresses
So the obvious question is: so what part of the hex code needs to be edited? We do not know that most of the code does... we only know where certain values are in the code because the hex addresses have been determined (not by me). Here is a spreadsheet of the hex addresses of the values you may want to edit:
SCOREBOARD_offset.xlsx
Sheet1 4C0C-4C0F (4D4C - 4D4F),font all move X 4C10-4C13 (4D50 - 4D53),font all move Y,Increasing Integer Moves it Down/Decreasing Moves it Up 4BBC-4BBF (4CFC - 4CFF),away team color bar X,Decreasing Integer Moves it Left/Increasing Moves it Right 4BC0-4BC3 (4D00 - 4D03),away team color bar Y,I...
Note that I am in the process of updating the hex addresses... for some reason the program with which the hex addresses were determined lists different addresses than Hxd and other hex editors.
Let's begin by changing the team name font color from black to white. We look at the spreadsheet and see that the hex address for the away team font color is 9C0-9C3 (B00-B03 in HXD) and for the home team is A20-A23 (B60-B63 in HXD). So what do these numbers mean? Lets look at the .big file opened in Hxd so that we can see how to use these addresses:
Note that I have only taken a screenshot of the first four columns for the purpose of explanation and clarity... there will be addresses which reference rows beyond '03'.
So because the address for the away team font color is B00-B03, we need to edit the hex offsets B00, B01 and B02. Note that there is a reason I did not list B03... hex values are six digits long (hence the name hex). The characters which follow the hex code at the addresses we need to edit do serve a purpose, though. The 'FF' signifies that the preceding six digits were color values. As you can see, the values are currently '00 00 00' for both addresses (so it reads '00 00 00 FF'). The value is entered as a hex color code, and code for black is '00 00 00'. The code for white is 'FF FF FF', so this is what we will change the values to: 'FF FF FF' (which will read 'FF FF FF FF')
Looking up hex color codes is very simple. You can simply set the color in photoshop and the hex code is displayed below. Let's say that I wanted the font to be yellow... I would select the color in photoshop that I want and below you will see the hex color code:
The color code values are Red / Green / Blue. Because the code is 'FF EA 00', that means that the value for Red is 'FF', the value for Green is 'EA' and value for Blue is '00'. The way that the code is entered into the .big is with these three reversed in order, though. This is important to remember. So the values would be entered B / G / R... therefore, if I wished to made the team names yellow I would enter 00 EA FF (which would read '00 EA FF FF').
After editing the team name color value, let's save and ensure that our changes have taken effect. This is one thing that makes scoreboard creation laborious: you will need to launch the game and begin a match to see each edit that you make.
As you can see in this screenshot:
we have successfully edited the team name. Now we need to do the same for the score color values and clock (which will be blue)
Finally, please note that although you will see a three values for the score color, we will actually be taking an easier route which will be to edit the following address: 26098-260A7. When you navigate to this address (which is at the end of the file, so just scoll to the bottom and then scroll up to it) look to the right where where the 'Decoded Text' is. You will notice that it the code is displayed in normal letters, and it currently is "COLOR_TEXT_WHITE". We are going to edit this from white to navy blue... so place your cursor in front of the 'C' in the decoded text column and being typing the following (it will automatically overwrite the code when you type): "COLOR_TEXT_NAVY_BLUE".
Please let me know if this tutorial structure will work. If you are finding that this is difficult to follow let me know so that I don't waste time making Part 2.
Do you happen to have a .big file to edit the Popups?
yilmaz.2535
Club Supporter
Which Big file is used to edit it?Brother, how are you?
Do you happen to have a .big file to edit the Popups?
Futbol Club
Club Supporter
Which Big file is used to edit it?
I think they are the ones from globalComponents, but all the parts come separately
yilmaz.2535
Club Supporter
Which one is the general?Sanırım bunlar globalComponents'tan olanlar, ancak tüm parçalar ayrı ayrı geliyor
Futbol Club
Club Supporter
no idea, that's why I'm askingWhich one is the general?
yilmaz.2535
Club Supporter
I checked for a long time yesterday, I'm not sure if it is there, maybe FIFA19 Big File is required.no idea, that's why I'm asking
Futbol Club
Club Supporter
I'll download the game and look for it thenI checked for a long time yesterday, I'm not sure if it is there, maybe FIFA19 Big File is required.
thanks bro